Premium Options
If you're looking for even quicker ways of manipulating your photos, check out the range of Photoshop actions on Envato Market, such as Charles Brown's Universal Background Removal Pack, which includes three background-removal actions to help you extract images from white, colored, or dark backgrounds.
Original Image
Before we begin, download the image that we will be working with. As you can see, there are two individuals in this photo. In today's tutorial, we will use Photoshop CS5's Content Aware Feature to remove the man on the left.
Step 1
Using the content aware tool on different images produces different results. An image with a gradient background such as the sky in this image is quite tricky to work with. Open beach.jpg in Photoshop.
Step 2
We are extracting the person on the left from this photo. Using the Pen Tool, (P) Begin by making a path around the subject. The nice thing about using content aware is that you do not have to be exact when making a selection. In fact, do your best not to cut too close to the subject.


Step 3
Once you complete the path around the subject, turn it into a selection. This can be done by right clicking on the path and selecting Make Selection.

Step 4
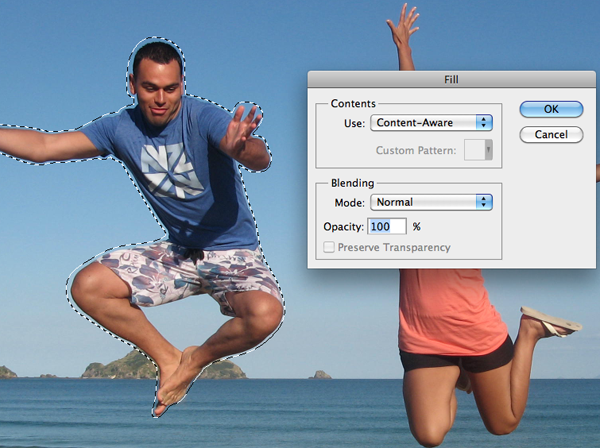
Now we have an active selection around our subject. In this step we will make the subject disappear from the image using Content Aware Fill. To do this, go to Edit > Fill.


Step 5
In this step we will remove some of the other artifacts in the image using the same process. The content aware tool did miss a spot where the subject’s foot originally was. To do this, draw a rectangle around the area using the rectangle selection tool. And use the content aware fill as we have done in the previous steps.


Step 6 (Optional)
Using the Crop Tool (C) lets crop the image so that the focus is drawn to the woman jumping. To do this, just crop out an area of the image that you would like to keep. Beware of the shadow that is left behind from the person that we have removed. You can use the Content Aware feature to remove this shadow but I have decided to crop it out altogether.
Step 7 (Optional)
In this step we will enhance the photo by giving it a more vibrant look. The colors currently appear somewhat dull. There are many ways to accomplish this but we will use Color Curves. To do this, go to Image > Adjustments > Curves, (Cmd + M). A dialog box will pop-up and we will select each of the channels, R, G, B and work on them separately. Select the Red channel from the dropdown menu.We are going to make two points on the graph. One in the bottom of the top right square, and one in the top of the bottom left square.


Final Image
Your image should now look something like the one seen below. As you can see, we have removed the man on her left with very little effort using Photoshop CS5's new Content Aware Feature.
No comments:
Post a Comment