In this Photoshop tutorial,
we're going to look at a great way to help keep things running smoothly
as we edit our images by keeping our Photoshop file sizes as small as
possible using adjustment layers! In a previous tutorial,
we looked at one of the major benefits of adding Photoshop's adjustment
layers to our photo editing workflow, which is that they allow us to
work flexibly and non-destructively on our images. We can make as many
edits and re-edits as we want to a photo and never have to worry about
making a single permanent change to the original image. Be sure to check
out our Non-Destructive Photo Editing with Adjustment Layers tutorial for more information.
Being able to work non-destructively on our images is certainly a
great reason to stop using Photoshop's standard image adjustments and
start using adjustment layers, but there's other equally good reasons to
make the switch. One of the biggest complaints with Photoshop is that
no matter how much memory (RAM) you have in your computer, it never
seems to be enough. And with the number of megapixels in the latest
digital cameras always increasing, the problem just keeps getting worse.
Larger photos mean larger file sizes, and the larger the file size, the
more of your computer's memory Photoshop needs to work with it. And
that's just to get the original photo open your screen. Typically, as
you edit the photo, you add more and more layers, and each one of those
layers takes up more and more of your computer's memory. On top of that,
Photoshop needs even more memory to complete all of the fancy, complex math that goes on behind the scenes as you're working on the image.
If your computer runs out of memory as you're working, Photoshop has to use the scratch disk,
which is simply an area of your computer's hard drive that Photoshop
uses as memory. The problem is, your hard drive is much, much slower
than actual system memory, which means that any time Photoshop is forced
to use the scratch disk, it will run that much slower.
Is there any way that we can reduce the amount of memory that
Photoshop needs? There sure is, and that's by keeping our file sizes as
small as possible. One way to do that would be to throw out our
expensive digital cameras and start taking all of our photos with the
little 2 or 3 MP camera inside our cell phones, although the bride and
groom may not be too impressed when you show up to take their wedding
photos with your iPhone. A better solution would be to come up with a
more efficient way of working on our images, one that keeps our file
sizes in Photoshop as small as possible without sacrificing any of our
editing capabilities. A great way to do that is by using adjustment
layers. Let's look at an example.
Here we have a photo I snapped one Spring evening while walking through a park:
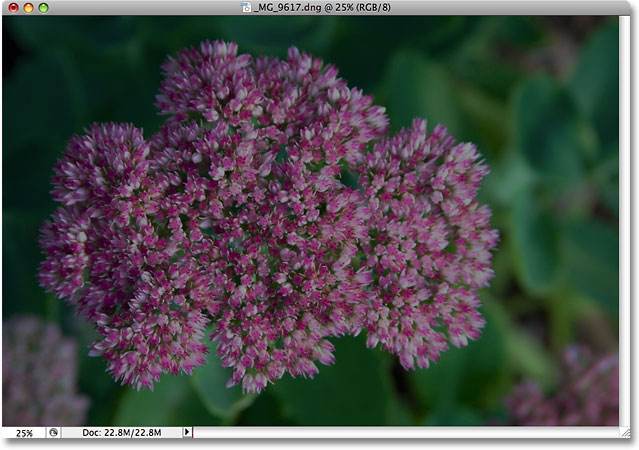
An underexposed photo.
The image is underexposed and needs to be brightened. Back in our Screen Your Way To Better Exposure tutorial, we looked at a quick and easy way to fix underexposed images using Photoshop's Screen
blend mode. I'm going to quickly run through the same steps here.
Before I do anything though, let's find out how large my Photoshop
document currently is. We can do that by looking along the bottom of the
document window:
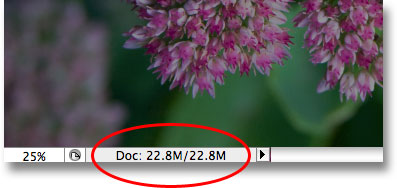
The current size of the Photoshop file is displayed along the bottom of the document window.
You'll see two file sizes listed beside each other. The one on the
left tells us how large the Photoshop file would be if we were to
flatten the document down to a single layer, while the one on the right
tells us how large our file actually is (the unflattened version) with
all of its separate layers still intact. My document window is currently
showing the exact same file size (22.8 MB) for both
the flattened and unflattened version, and that's because I just opened
the image and haven't done anything to it yet. If we look in the Layers
palette, we can see that the photo is sitting all by itself on the
Background layer, and since there's only one layer in the document, both
the flattened and unflattened version are exactly the same size:
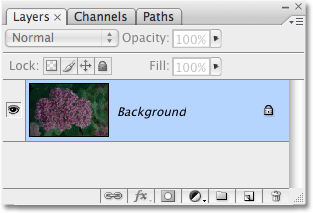
The flattened and unflattened version of the document are the same size with only one layer in the Layers palette.
Let's see what happens when I start brightening the image using what
we might call the "traditional" way of working in Photoshop. First, I'll
duplicate the Background layer using the keyboard shortcut Ctrl+J (Win) / Command+J
(Mac). Photoshop adds a copy of the Background layer directly above the
original and names the copy "Layer 1". Then, to brighten my image, I'm
going to go up to the Blend Mode option at the top of the Layers palette
and change the blend mode from "Normal" to Screen:
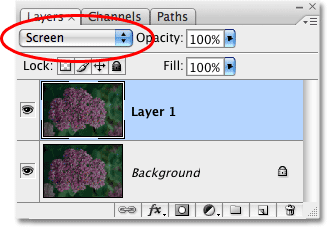
The Layers palette showing the copy of the Background layer above the original, with its blend mode changed to Screen.
Simply by changing the blend mode of the duplicate layer to Screen, the photo now appears brighter:

The photo now appears brighter after changing the blend mode to Screen.
That was certainly easy enough, but let's see what's happened to the
size of our Photoshop file. Again, we can see the current file size by
looking along the bottom of the document window. In my case, if we look
at the size of the unflattened version (the number on the right), we can
see that just by duplicating my Background layer, I've managed to
double the size of the file. Instead of needing 22.8 MB of memory to
display my image, Photoshop now needs 45.6 MB of memory:
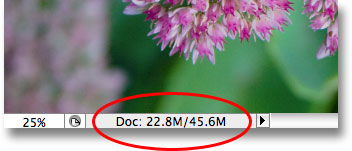
Duplicating the Background layer has caused the Photoshop document to double in file size.
I think my photo could still use a little more brightening, so I'm
going to duplicate "Layer 1" by again pressing the keyboard shortcut Ctrl+J (Win) / Command+J
(Mac). This adds a second copy of my image directly above "Layer 1".
I'm going to leave the blend mode of this new layer set to Screen
since I'm using it to brighten my image even more, but I actually find
that the image is now a little too bright, so I'm going to fine-tune the
brightness by lowering the Opacity of the new layer down to 50%:
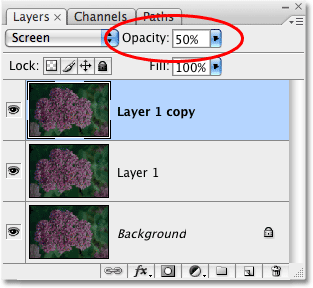
Adding a second copy of the image, then lowering the opacity of the new layer to 50%.
I've now successfully brightened the photo using nothing more than a
couple of copies of the image, the Screen blend mode and the Opacity
setting:
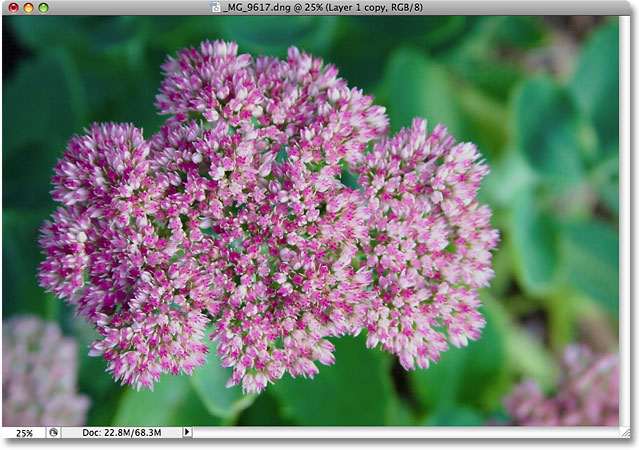
The photo now appears even brighter after adding a second copy of the image.
Let's check on our file size at the bottom of the document window,
where we can see that our original 22.8 MB file has now tripled in size
to 68.3 MB, all because we duplicated the original image twice:
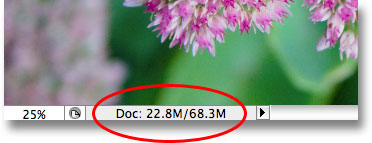
Duplicating the image twice has tripled the file size of the Photoshop document.
Brightening the image with the Screen blend mode has resulted in the
colors looking a little dull, so I'm going to finish things off by
boosting the color saturation. This time, rather than simply duplicating
the top layer, I'm going to merge all three existing layers onto a new
layer above them using the keyboard shortcut Shift+Ctrl+Alt+E (Win) / Shift+Command+Option+E (Mac). We can see in the Layers palette that all three layers have now been merged onto a fourth layer at the top:
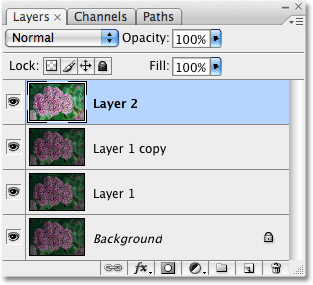
The three layers have been merged onto a separate layer above them.
To boost the colors, I'll go up to the Image menu at the top of the screen, then I'll choose Adjustments, and then I'll select the Hue/Saturation
command. Rather than affecting every color in the image, I just want
to boost the color of the flower itself, not the leaves behind it. So
when the Hue/Saturation dialog box appears, I'll select Reds from the Edit
option at the top of the dialog box. This allows me to target only the
red colors in the photo, which means the green leaves in the background
won't be affected. Then I'll click on the Saturation slider in the middle of the dialog box and drag it towards the right to a value of around +45:
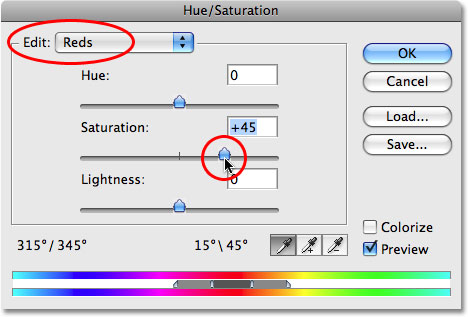
Increasing color saturation with the Hue/Saturation command.
I'll click OK to exit out of the dialog box, and we can see that the photo now appears more colorful:
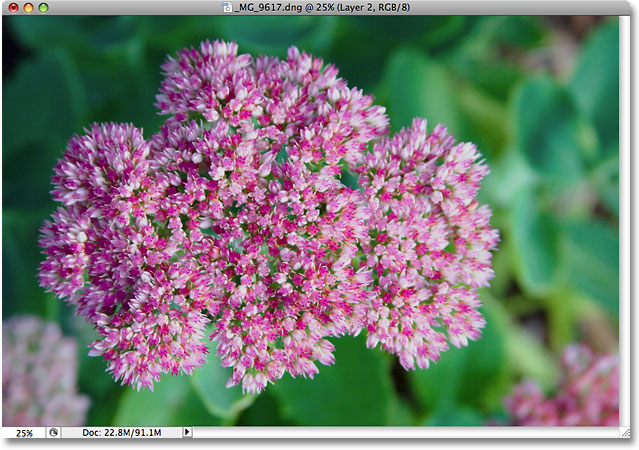
The color saturation in the photo has been increased.
With about two minutes worth of work, I've managed to turn a dark,
underexposed image into a bright and colorful one. Unfortunately, I've
also managed to increase the file size of my Photoshop document from the
22.8 MB it was originally all the way up to 91.1 MB,
which mean Photoshop now needs four times the amount of memory to
display my image on the screen, not to mention all the additional memory
it now needs to perform all the math behind the scenes:
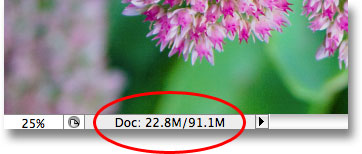
The Photoshop document is now four times its original size.
Keep in mind that this was just a simple example of how quickly the
file size of our Photoshop documents can increase as we edit our images.
Your computer may not have a problem working with a document that's
only 91.1 MB in size, but with serious photo editing work, or if you're
creating complex photo effects, you could easily find yourself working
with hundreds of layers, each one taking up more and more of your
computer's memory. And as I mentioned earlier, the problem only gets
worse as the number of megapixels in today's digital cameras continually
increases.
How can we keep the file size of our Photoshop documents from getting
out of control? One simple and effective way is by using adjustment
layers whenever possible. Let's go through the exact same steps that we
just looked at, but this time, rather than creating copy after copy of
our image, we'll use adjustment layers!
First, before we begin editing the photo with adjustment layers, I'll
revert my image back to its original unedited state by going up to the File menu at the top of the screen and choosing Revert.
My photo is now back to looking dark and underexposed, and I'm back to
having just one layer - the Background layer - in the Layers palette:

The photo has been reverted back to its original state.
If you remember, the first thing we did to brighten the image was
duplicate the Background layer and change its blend mode to Screen.
Problem was, by duplicating the Background layer, we doubled the file
size of our Photoshop document. Let's see what happens when I use an
adjustment layer instead. I'm going to click on the New Adjustment Layer
icon at the bottom of the Layers palette, which brings up a list of all
the adjustment layers I have to choose from. As we saw in the Non-Destructive Photo Editing with Adjustment Layers tutorial, most of Photoshop's standard image adjustments, found by going up to the Image menu and choosing Adjustments, are also available as adjustment layers. I'm going to select a Levels adjustment layer from the list:
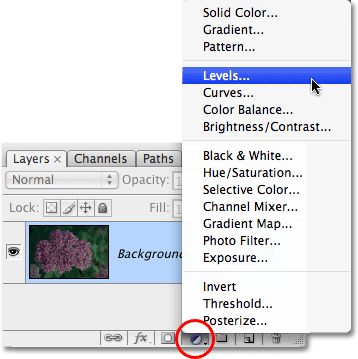
Selecting a Levels adjustment layer from the bottom of the Layers palette.
When the Levels dialog box appears, I'm just going to click OK in
the top right corner to exit out of it, since there's absolutely nothing
I need to do with it. I'm simply adding the Levels adjustment layer
instead of duplicating the Background layer. Photoshop adds the Levels
adjustment layer directly above the Background layer and names it
"Levels 1". Then, just as I did before, I'll go up to the Blend Mode option at the top of the Layers palette and change the blend mode of the adjustment layer from "Normal" to Screen:
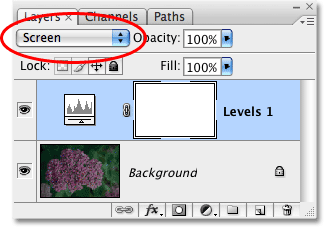
The Layers palette showing the newly added
Levels adjustment layer above the Background layer, with its blend mode
set to Screen.
The photo now appears much brighter. In fact, it appears just as
bright as when we duplicated the Background layer and changed its blend
mode to Screen. The results are exactly the same:
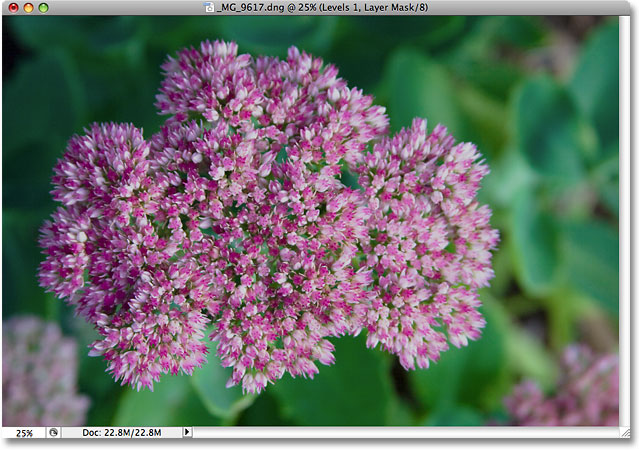
The photo is now brighter after changing the blend mode of the adjustment layer to Screen.
If the results are the same, what's so great about using the
adjustment layer instead of a copy of the Background layer? What's great
about it becomes clear when we check out the new file size of our
document. If you recall, when we duplicated the Background layer, it
doubled the size of our Photoshop document from 22.8 MB up to 45.6 MB.
This time, by using a Levels adjustment layer instead of duplicating the
Background layer, our file size remains unchanged:
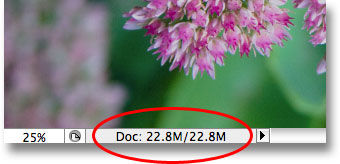
The file size remains the same after adding the Levels adjustment layer.
We just saved ourselves 22.8 MB of additional file size simply by
using an adjustment layer in place of a normal pixel-based layer!
Whenever we add an adjustment layer to our document, Photoshop stores
all the information about the image within the adjustment layer itself,
but it does it without the large file size increases that we get from
adding pixel-based layers. In fact, in my case here, the file size
increase was so small that it didn't even register. That won't always be
the case, but the increase will always be much less than if you had
used a pixel-based layer.
Why did I choose a Levels adjustment layer as opposed to a Curves or
Hue/Saturation adjustment layer? I chose Levels only because it's one of
the most commonly used adjustment layers, but since I wasn't planning
on doing anything with the adjustment layer (other than changing its
blend mode) and only added it in place of a pixel-based layer, I could
just as easily have chosen any other type of adjustment layer from the
list. Photoshop would have stored all the information about my photo
within the adjustment layer no matter which type I chose.
Let's continue on following the same steps we used previously to edit
the image. Since my image still needs a little more brightening, I'm
going to duplicate my Levels adjustment layer using the same keyboard
shortcut we use the duplicate a pixel-based layer, Ctrl+J (Win) / Command+J
(Mac). Photoshop adds a copy of the Levels adjustment layer directly
above the original and names it "Levels 1 copy". Normally, we'd want to
rename layers and give them more meaningful names, but to save us some
time, I'll just carry on. I'll leave the blend mode of the new
adjustment layer set to Screen and fine-tune the brightness of the image
by lowering the Opacity of the adjustment layer to 50%,
just as I did with the pixel-based layer. Notice how Photoshop allows
us to do many of the same things with adjustment layers that we can do
with pixel-based layers, like duplicating them, changing their blend
mode and changing their opacity settings:
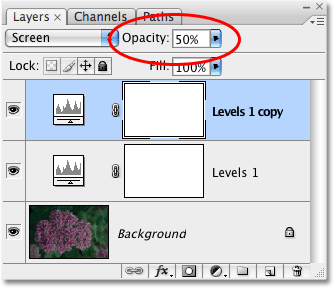
Lowering the opacity of the second Levels adjustment layer to 50%.
Again, we can see by looking in our document window that the results
are exactly the same as if when we were using pixel-based layers. I've
corrected the exposure of the photo using nothing more than a couple of
adjustment layers, the Screen blend mode and the Opacity setting:
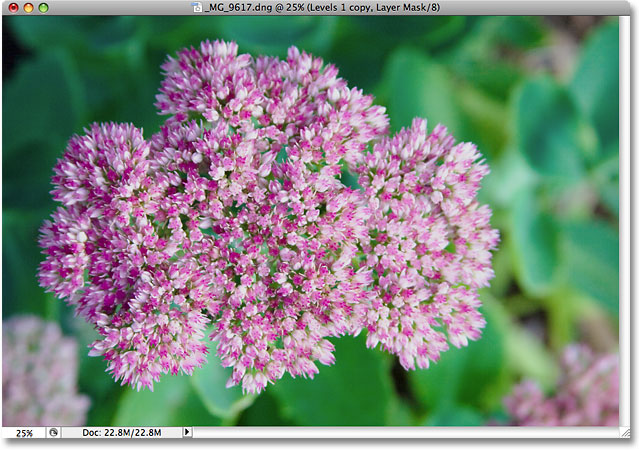
The exposure has been corrected once again, this time with adjustment layers.
When we were using pixel-based layers, our file size at this point
had tripled from what it was originally, going from 22.8 MB up to 68.3
MB. Yet even though we've now added two Levels adjustment layers, our
file size still hasn't changed:
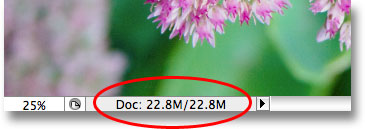
The file size of the document remains unchanged even after adding two adjustment layers.
We've now managed to save ourselves over 45 MB in file size simply by
replacing pixel-based layers with adjustment layers! Again, it won't
always be the case where you see no file size increase at all, but the
increase will always be much smaller than if you had used a pixel-based
layer. Let's finish things off by boosting the color saturation of the
photo. Rather than merging all three layers onto a fourth layer like I
did last time and then using a standard Hue/Saturation adjustment from
the Image menu, I'll simply click on the New Adjustment Layer icon at the bottom of the Layers palette and choose a Hue/Saturation adjustment layer from the list:
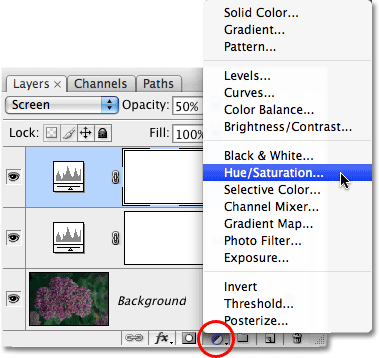
Choosing Hue/Saturation from the list of adjustment layers.
This brings up the exact same Hue/Saturation dialog box that we saw
when I chose the standard Hue/Saturation command from the Image menu
earlier. And just as I did earlier, I'll first select Reds from the Edit
option at the top of the dialog box so I'm boosting the colors in the
flower itself, not the green leaves behind it. Then I'll click on the Saturation slider and drag it towards the right to a value of +45:

Adjustment layers give us exactly the same options as their standard image adjustment equivalents.
I'll click OK to exit out of the dialog box, and my photo now looks
identical to the result we achieved using pixel-based layers and a
standard Hue/Saturation adjustment:
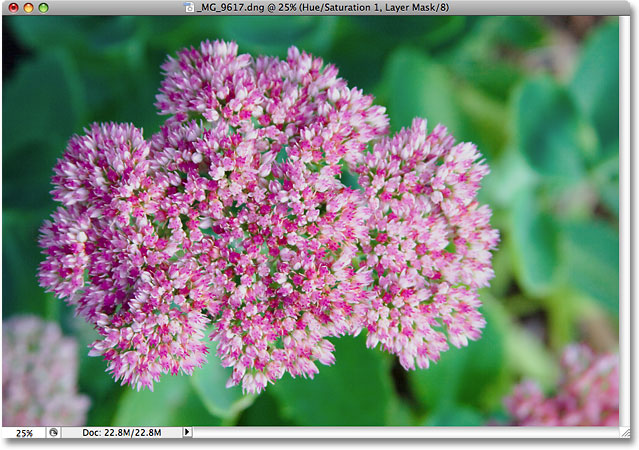
The final result is exactly the same as before.
When we performed the same steps using pixel-based layers, the file
size of our final result was all the way up to 91.1 MB, a considerable
jump from the photo's original size of 22.8 MB. This time, we've
achieved the exact same final result using adjustment layers in place of
the pixel-based layers, yet the file size of our Photoshop document
still hasn't increased beyond the original:
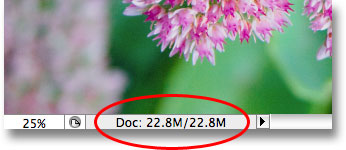
The file size of the final result remains unchanged thanks to adjustment layers.
Again, this was just a quick example of how adjustment layers can
keep the file size of our Photoshop documents down to a minimum, yet
even in this simple example, I still managed to shave around 68 MB off
the size of my file simply by using adjustment layers in place of
pixel-based layers! Of course, digital images are made up of pixels and
you can't replace every pixel-based layer in your document with an
adjustment layer. But the next time you find yourself duplicating a
pixel-based layer so you can apply one of Photoshop's standard image
adjustments to it like Levels, Curves or Hue/Saturation, try adding an
adjustment layer instead. Photoshop and your computer will thank you for
it!
No comments:
Post a Comment